Toshiba

United States

Menu
Close

Toshiba

United States

Support » Televisions » Television Product Support

Select a Featured Support Offering to learn more

Product
Information

Featured
Help Topics

How-To
Videos

Parts &
Remote Controls

** IMPORTANT NOTICE FOR TELEVISIONS MANUFACTURED IN 2015 OR LATER **

To find manuals, specifications, quick start guides, firmware and contact information.
For TVs manufactured in 2021 or later, please visit
https://www.toshibatv-usa.com/support
For TVs manufactured in 2015 to 2021, please visit
TVS REGZA Corporation

Supported Television Models

Model No.
User Guide Spec Sheet Resource Guide
13A21User Guide
19L4200UUser GuideSpec Sheet
19SL410UUser GuideSpec Sheet
19SLV411UUser GuideSpec Sheet
23L1350UUser GuideSpec SheetResource Guide
23L2300UUser GuideSpec SheetResource Guide
24L4200UUser GuideSpec Sheet
24SL410UUser GuideSpec Sheet
24SL415UUser GuideSpec Sheet
24SLV411UUser GuideSpec Sheet
24V4210UUser GuideSpec SheetResource Guide
29L1350UUser GuideSpec SheetResource Guide
32C110UUser GuideSpec Sheet
32C120UUser GuideSpec Sheet
32DT2UUser GuideSpec Sheet
32FT2UUser GuideSpec Sheet
32L1300UUser GuideSpec SheetResource Guide
32L1350UUser GuideSpec SheetResource Guide
32L1400UUser GuideSpec SheetResource Guide
32L2200UUser GuideResource Guide
32L2300UUser GuideSpec SheetResource Guide
32L2400UUser GuideSpec SheetResource Guide
32L4200UUser GuideSpec Sheet
32L4300UUser GuideSpec SheetResource Guide
32SL410UUser GuideSpec Sheet
32SL415UUser GuideSpec Sheet
32SLV411UUser GuideSpec Sheet
32TL515UUser GuideSpec Sheet
39L1350UUser GuideSpec SheetResource Guide
39L22UUser GuideSpec Sheet
39L2300UUser GuideSpec SheetResource Guide
39L4300UUser GuideSpec SheetResource Guide
40E20U1User Guide
40E220UUser GuideSpec Sheet
40FT2UUser Guide
40L1400UUser GuideSpec SheetResource Guide
40L2200UUser GuideSpec SheetResource Guide
40L2400UUser GuideSpec SheetResource Guide
40L3400UUser GuideSpec SheetResource Guide
40L5200UUser GuideSpec Sheet
40S51UUser GuideSpec Sheet
40SL412UUser GuideSpec Sheet
42L6200UUser GuideSpec SheetResource Guide
42SL417UUser GuideSpec Sheet
42TL515UUser GuideSpec Sheet
46G310UUser Guide
46L5200UUser GuideSpec Sheet
46SL412UUser GuideSpec Sheet
46SL417UUser GuideSpec Sheet
46UL610UUser GuideSpec Sheet
47L6200UUser GuideSpec SheetResource Guide
47L7200UUser GuideSpec SheetResource Guide
47TL515UUser GuideSpec Sheet
50L1350UUser GuideSpec SheetResource Guide
50L1400UUser GuideSpec SheetResource Guide
50L1450UUser GuideSpec SheetResource Guide
50L2200UUser GuideSpec SheetResource Guide
50L2300UUser GuideSpec SheetResource Guide
50L2400UUser GuideSpec SheetResource Guide
50L3400UUser GuideSpec SheetResource Guide
50L4300UUser GuideSpec SheetResource Guide
50L5200UUser GuideSpec Sheet
50L7300UUser GuideSpec SheetResource Guide
50M2UUser GuideResource Guide
55G310UUser GuideSpec Sheet
55L6200UUser GuideSpec SheetResource Guide
55L7200UUser GuideSpec SheetResource Guide
55L7400UUser GuideSpec SheetResource Guide
55S41UUser Guide
55SL412UUser GuideSpec Sheet
55SL417UUser GuideSpec Sheet
55TL515UUser GuideSpec Sheet
55UL610UUser GuideSpec Sheet
58L1350UUser GuideSpec SheetResource Guide
58L4300UUser GuideSpec SheetResource Guide
58L5400UUser GuideSpec Sheet
58L7300UUser GuideSpec SheetResource Guide
58L7350UUser GuideSpec SheetResource Guide
58L8400UUser GuideSpec SheetResource Guide
58L9300UUser GuideResource Guide
65HT2UUser Guide
65L5400UUser Guide
65L7300UUser GuideSpec SheetResource Guide
65L7350UUser GuideSpec SheetResource Guide
65L9300UUser GuideResource Guide
65L9400UUser GuideResource Guide
65UL610UUser GuideSpec Sheet
84L9300UUser GuideResource Guide
TD-Z421User GuideSpec Sheet
TD-Z471User GuideSpec Sheet
TD-Z551User GuideSpec Sheet
TD-Z701User GuideSpec Sheet

Top Featured Help Topics

  • Where can I purchase PARTS or a NEW REMOTE CONTROL for my TV
  • I need help with my Remote Control

    If your remote control is not working properly follow these quick steps below.

    Remote Quick Check

    • Replace the remote control batteries.
    • Clean the upper edge of the remote control (transmission window).
    • Check the battery terminals.

    If your remote control still does not work properly

    There are four conditions that can cause a remote to function improperly :

    • Bad batteries.
    • An electronic glitch in the remote.
    • A defective remote.
    • A defective remote sensor on the TV

    To determine which of these conditions is causing your problem, follow these steps:

    1. Open the battery compartment on the back of the remote and remove both batteries.
    2. Press and hold any button on the remote for 20 Seconds.
    3. Release the button and reinsert the batteries properly.
      Important : Make sure to insert the batteries properly.
    4. If the remote works, there was a glitch in the remote that was cleared when you discharged the remote in the prior step. If the remote does not work, continue on.
    5. Replace the batteries in the remote with new batteries.
      Important : Make sure to insert the new batteries.
    6. If the remote works, your original batteries are dead. Continue using with new batteries. If the remote does not work, there may be something wrong with the remote or with the remote sensor on the TV. Continue on.
    7. To test the remote control and the remote sensor, perform one of the following tests: Digital Camera test or Another remote on this TV.

    Digital Camera test using a phone camera
    If you have any digital camera (including a phone camera), you can test any remote. To test the remote, follow these steps:

    1. Turn your camera on.
    2. Aim the remote at the lens of the camera from about 6-10 inches away.
    3. Press any button on the remote. You will see the Infra Red eye of the remote flashing on the LCD screen of tour camera if the remote is working properly.
    4. If the above test indicated the remote is working, the problem is in the remote sensor on the TV. If the above test indicated that remote is not working, you have a defective remote.

    Test Another Remote on this TV
    If the TV has another remote that is known to work on this TV, you can test that remote on the TV. To test a second remote on the TV, follow these steps:

    1. Make sure that the second remote is in the TV mode.
    2. Press [Power] on the remote and see if it turns the TV on.

    If the TV turns on, the problem is in your Toshiba remote. If the TV does not turn on, the problem is in the remote sensor.

  • My TV Does not power ON

    If your television does not power on a number of things can cause this condition

    • Remote control is non functional
    • TV system is locked up and needs to be reset
    • TV Input is set to a non active source
    • Loss of input signal

    See the troubleshooting tips under each of these items to restore your TV back to normal operation

    Remote control is non functional

    Try pressing the power button on the TV itself to rule out the remote control as the issue.

    TV system is locked up and needs to be reset

    Unplug the TV from AC wall outlet for 60 seconds then plug back in. Ensure that the AC wall outlet is functional by trying another appliance in the outlet.

    TV Input is set to a non active source

    With the TV powered on press the input button on the TV to see if there is any activity on the on screen display. If there is on screen display then switch to another fucntional input source.

    Loss of input signal

    Press the menu button on the TV to see if the menu appears on the TV. If the menu appears change the input source to another know good input by pressing the input button on the TV

  • My TV has a fuzzy of low quality picture

    The standard cable channels or standard over-the-air (OTA) channels often appear fuzzy or blurry on your LCD TV because of a mismatch between the resolution capability of your TV and the resolution of the analog signal transmitted by your cable company or OTA broadcaster. The signal you are getting from your cable company is a low definition 480i signal, with a resolution of approximately 640 by 480. In most cases, your LCD TV is a high definition TV with a resolution capability of 1366 by 768, 1440 by 900, or 1920 by 1080. It is this mismatch between the standard cable or OTA signal resolution and the TV resolution that causes the problem.

    Note: In many cases, even when you are viewing digital channels, the picture will look fuzzy. This happens because the signal your set is receiving, although digital, is a digitized standard (480i or 480p) transmission, not a digital high definition transmission. Again, you have the mismatch between a standard resolution picture and your high definition TV display.

    Fixing the Problem

    There are three ways you may be able to fix the blurriness problem:

    • Reducing the picture size to 4:3
    • Using the Sharpness function
    • If you have a cable box, by changing the connections

    All three are described below.


    Reducing the Picture Size to 4:3

    • If you are watching an analog channel or transmission, and the picture is fuzzy, you may be able to clear up the picture by reducing the size of the picture to 4:3, the native size of analog TV pictures.
    • To change the picture size to 4:3, press the P.Size button on your remote until 4:3 appears on the screen. The 4:3 picture has black or grey borders on the left and right.


    Using the Sharpness Function If the picture on your LCD TV is blurry, you may be able to clear it up with the Sharpness function. To use the Sharpness function on most Toshiba LCD TVs, follow these steps:

    1. Turn on your TV.
    2. Press the Menu button on your remote. The Main menu appears.
    3. Press the Right or Left arrow button on your remote to select Picture, and then press the Down button. The Picture menu appears.
    4. Use the Up or Down button on your remote to select Sharpness.

    Note: On some model LCD TVs, you use the Enter button to select Sharpness.
    Use the Right arrow button on your remote to increase the sharpness.
    Press the Exit button to exit.


    If You Have A Cable Box

    • If you have a cable box and the picture on your LCD TV is fuzzy or blurry, chances are you have it connected to your cable box using the Composite (standard, AV, Cable) or S-video connections. These are the lowest quality connections.
    • To improve your picture, try connecting your LCD TV to your cable box using the Component (Pb, Pr, and Y) connections. If you have digital cable or you receive over-the-air digital programs, try adding digital DVI or HDMI connections.
    • Component and DVI connections carry video only. If you choose the Component or DVI connections, you must also connect the Left and Right Audio out on your cable box to the appropriate Left and Right audio in jacks on your TV. HDMI carries both video and audio. If you choose HDMI, you need to connect only the HDMI cable.
    • Also, if you choose DVI or HDMI, and you have a set-top-box or cable box, you must set the output resolution of the box to at least 480p. Most DVI and HDMI inputs do not accept 480i (standard analog) signals.

    Note 1: If your cable box doesn't have Component, DVI, or HDMI connections, contact your cable company to see if they have replacement boxes with these kinds of connections built in. Also, connecting using DVI or HDMI will only help on the digital channels.

    Note 2: If you connect using DVI or HDMI, you must also leave your Composite (AV) or S-Video connections intact to receive standard, analog stations.

    Important: If you add connections, make sure you use the Source button on your remote to change to the appropriate video source when you watch your TV.

  • I need help hooking up a DVD/Blu-Ray player to my TV

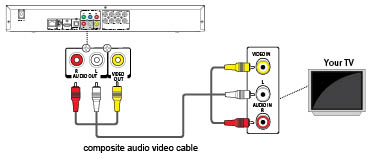
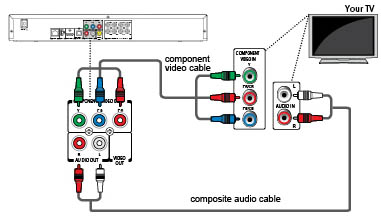
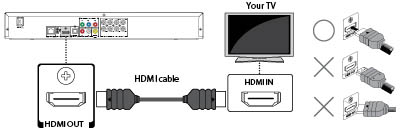
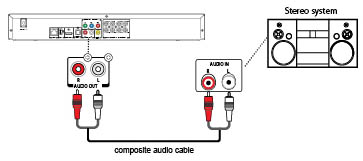
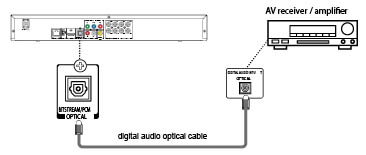
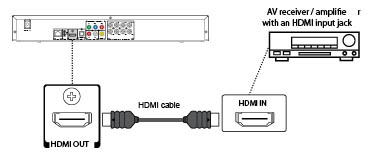
    When you connect your Blu-ray or DVD player to your TV or audio receiver, make sure turn both devices off and unplug them. Refer to the owner's manual for your player, television and audio receiver for full details and instructions.

    Generic player used in images. Your player may or may not look similar and be equipped with the same inputs. Refer to the owner's manual for your player for available connections.

    Connecting to TV using composite cables (Good)

    • If your TV only has one audio input, you can connect the left and right audio outputs of the DVD player to a Y adapter (not supplied) and then connect to your television.

     
    Connecting to TV using component cables (Better)
    • Some TV’s or monitors are equipped with component video inputs. Connecting to these inputs allows you to enjoy higher quality picture playback. The Red Pr, Blue Pb, and Green Y are the component video out puts.  When using component cables, you will need audio cables connected to the audio system or TV for sound.


    Connecting to TV using an HDMI cable (Best)

    • When connecting with a HDMI cable, use the HDMI cable only, no other video or audio cables are required with this type of connection.


    Connecting to Audio System using composite cables (Good)


    Connecting to Audio System using a digital cable (Best)


    Connecting to Audio System using an HDMI cable (Best)

  • There is no Audio coming through my speakers
    1. Please check your connections and make sure if you are using Composite “yellow, white, and red cables”, S-Video, with “white, and red” or Color Stream Component “green, blue, red, white and red cables,” that the white and red cables which are used for audio are plugged in securely into the same inputs as the video.  
    2. The station may have broadcast difficulties. Try another channel.
    3. The sound may be muted. Press VOLUME.
    4. If you have a cable box or satellite receiver, please make sure the TV’s volume, as well as the box’s volume is turned up sufficiently
    5. When the TV receives a stereo or SAP broadcast, the word “STEREO” or “SAP” appears on-screen when “ENTER” is pressed. The MTS feature is only available for analog signals on the ANT/CABLE input.
    6. To select STEREO if SAP appears on your TV screen, from the Audio menu, highlight Audio Setup and press “ENTER”. While in the MTS field, select Stereo. To save the new settings, highlight DONE and press “ENTER”.
    7. If you hear audio that seems “incorrect” for the program you are watching (such as music or a foreign language), the SAP mode may be on. Set the MTS feature to Stereo mode.
    8. If you still have problems after following these steps please contact Toshiba Customer Service.
  • I need help connecting my TV to Wi-Fi
    Issue

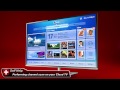
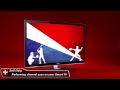
    During the initial setup of the Cloud TV (or after a reset of the TV) you are taken step-by-step to connect to a network wired or wirelessly for internet access and Cloud TV Services.

    If you chose to “Skip” the network setup or are connected to a wired network and wish to now connect to a wireless network, you will need to go back into the settings to connect.

    Procedure


    To connect to a wireless network, perform the following:

    1. Press the “Setup” button on the remote.
    2. Use the up/down arrows to select “Network”.
    3. Use the left/right arrow buttons to enter “Network Setup” and change the settings from “Wired” to “Wireless” if necessary.
    4. Select “Wireless Setup” and choose “Assisted Setup” from the available options and press the “OK” button on the remote.
    5. A list of available wireless networks will display, select the one you wish to connect to and press “OK”.
    6. Select “Security Key” from available options and press “OK”.
    7. Enter the network password for the wireless network you are connecting to.
    8. Once the correct password is entered, select “Done” and press “OK”.
    9. Select “Done” again when prompted on the next screen and press “OK”.
    10. The TV will connect to the network.
    11. Once connected, the screen will return to the “Network” menu.
    12. To perform a network connection test, go to the “Network Setup” menu and select “Network Connection Test” to verify the connection.

    The Cloud TV should now be connected to your wireless network.

  • I need help selecting a different input source on my TV

    Changing Inputs on your TV

    Question

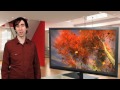
    There is no video/sound from my external device (blu-ray, cable, game console, etc...) with my device connected and the TV and device turned ON.

    Answer

    You may be having issues viewing or hearing an external device (DVD, Blu-Ray, Game Console) or cable TV channels from the Cable Box connected to your TV. The device is connected and ON.

    All TOSHIBA televisions offer the ability to connect multiple external media devices (DVD, Cable, etc…) through inputs (HDMI, Video, etc…) located on the rear of the TV. Not all TV’s are equipped with the same number and/or types of inputs. When a device is properly connected, powered on and streaming content, the TV must be on the corresponding Input for the location of the connection for that device to be able to see and hear the desired content.

    When connecting external devices, be sure to follow the instructions in the Owner’s Manual. The Owner’s Manual will show you how to properly connect your devices as well as how to set the TV inputs to allow viewing of the content from the device.

    The following video describes how to properly select your input based on the connected devices.

    1. Ensure the TV is off.
    2. Ensure your connected device is operating properly before putting into use with your TV.
    3. Connect the device to the correct Input on the rear of the TV as outlined in CHAPTER 2: CONNECTING YOUR TV in your Owner’s Guide.

      NOTE: The input connections on the rear of the TV correspond to selectable inputs you will choose after turning the TV and device on.

      NOTE: When connecting your laptop to your TV using the PC (VGA) connection, a seperate sound connection is required between the laptop and the television to listen to the laptops sound on the TV. This could be as simple as connecting a 3.5mm audio jack between the laptop speaker port and the rear of the TV. Refer to your TV Owner's Manual for detailed instructions on connecting sound.
    4. Turn on the TV and your connected device.
    5. Using the remote control, select INPUT to display the input list (or press INPUT on the front of the TV).

      NOTE: Some models will have the INPUT button in a different location on the remote control, older TV models may have a TV/Video button.
    6. Press the INPUT button and then the number for the desired input that corresponds to the connected device. See the graphic below for reference.

    NOTE: You may also press the INPUT button repeatedly or use the arrow buttons on the remote to select the input.

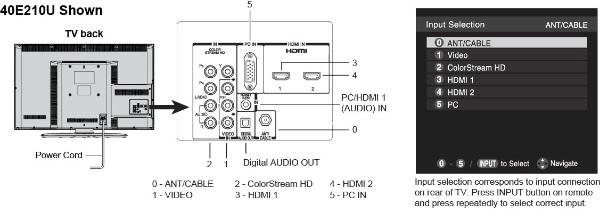
    NOTE: TV Model 40E210U shown for reference only, other models are similar.

  • Using WiDi with my Toshiba Television

    Using Intel® WiDi

    Intel® Wireless Display (Intel® WiDi) is supported on this TV. Toshiba has also included peer-to-peer wireless technologies to allow direct wireless connection between the TV and Intel® WiDi equipped PC or mobile device. If your PC or mobile device has Intel® WiDi, the Toshiba Cloud TVs allow you to display the small screen content on the big screen quickly and easily.

    1. Press the QUICK button to open the Quick Menu.
    2. Press the Up/Down (arrow) buttons to select Intel® WiDi and then press the OK button.
      A prompt will appear on the screen when Connection Type is set to Wireless. Select Yes.
    3. Launch the Intel® WiDi software on your device and select “scan for available adaptors”.
      Intel® WiDi device name and ID list will then be displayed on the device screen.
      Select the TV which you wish to connect to.
      “Connecting” will be shown on the TV.
    4. Connecting your PC to the TV the first time
      When selecting the Toshiba TV for the first time, a 4-digit or 8-digit code will appear on your TV screen. This code needs to be inputted into your computer to authenticate the connection.
      If authentication has already taken place
      “Please Wait” will appear on screen.
    5. After the Intel® WiDi connection is complete, the TV screen will mirror the content shown on the device screen.

    NOTE: When connecting Intel® WiDi, device must have power turned on.

    ❖❖ When the TV Network Settings are set to Wireless and Intel® WiDi software is starting up, other TV applications cannot be used.

    ❖❖ Intel® WiDi device name of the TV can be changed from the Intel® WiDi software.

    To exit Intel® WiDi:

    Exit Intel® Wireless Display by pushing the disconnect button on Intel® WiDi software on the device or by pressing the EXIT button on the TV remote control.

    NOTE If the device has been inactive for some time, the Intel® WiDi connection will be disconnected automatically.

    Changing the Intel® WiDi Device Name

    The TV's Intel® WiDi device name can be changed.

    1. Press the SETUP button.
    2. Select Network > Network Device Setup > Intel® WiDi Setup and press the OK button.
    3. Press the Up/Down (arrow) buttons to select Intel® WiDi Device Name and press the OK button.
    4. Select the Intel® WiDi Device Name and press the OK button. The Software Keyboard window will appear.
    5. Input the Intel® WiDi device name by using the software keyboard. Press the GREEN button.
    6. Select Done and press the OK button to save your setting.

    Device List

    Device List displays a list of MAC addresses for previously connected device that have been connected before. The maximum number that can be stored is 20.

    If the list run out of space, the least-recently-used MAC address will be deleted and the new MAC address added automatically.

    1. Press the SETUP button.
    2. Select Network > Network Device Setup > Intel® WiDi Setup and press the OK button.
    3. Press the Up/Down (arrow) buttons to select Device List and press the OK button.
      Device List will appear.

    The registered device can be deleted one by one by pressing Red button in the List.

    When doing so the following text can be seen “Do you want to unregister this device? Yes/No” (default cursor is “No”).

  • Setting up and using applications on my Toshiba SMART TV

    SMART TV A/V Remote App, Send & Play App and MediaGuide App Information

     A/V Remote App

    Description: The Toshiba AV Remote App allows you to operate a Toshiba TV and Toshiba Blu-ray player, connected to your home network, from a tablet or smartphone.
    Setup: After downloading and installing the App:

    1. Select "I Agree" after reading the End User License Agreement
    2. In the Device Selection select the Toshiba SMART TV Device name you had setup on the SMART TV
    3. Enter the 4 digit pin that is displayed on the TV screen
    4. Now that you have connected to the TV select the Toshiba SMART TV Device name again to see the remote control features available
    5. To view the app user guide select the settings button in the upper right corner of the app
    6. Select Operation Guide

     Send & Play App

    Description: The Toshiba Send & Play App allows you to send a URL from your tablet or smartphone to the web browser on your TV.
    Setup: After downloading and installing the App:

    1. Select "I Agree" after reading the End User License Agreement
    2. Choose a URL to open or type a URL that you wish to send to the SMART TV
    3. Click Send
    4. In the Device Selection select the Toshiba SMART TV Device name you had setup on the SMART TV
    5. Enter the 4 digit pin that is displayed on the TV screen
    6. The browser on the TV should open up and start playing the URL that was sent to it.

     MeidaGuide App

    Description: The Toshiba mediaGuide App is a channel guide application for tablets and smartphones. When you see what you like then send that content to your Toshiba SmartTV.
    Setup: After downloading and installing the App:

    1. Scroll to the bottom of the End User License Agreement
    2. Select "I Agree" after reading the End User License Agreement
    3. In the Device Selection select the Toshiba SMART TV Device name you had setup on the SMART TV
    4. Enter your Zipcode
    5. Enter your Cable service provider
    6. After a few moments you should then be able to view the media guide and select the programs you would liek to start watching
    7. To view the help guide for this app select the settings icon in the upper right corner of the app
    8. Select Help

Purchasing Parts and Remote Controls

To purchase parts for your TV or a new remote control CLICK HERE

If your remote control is not working properly follow these quick steps below.

Remote Quick Check

  • Replace the remote control batteries.
  • Clean the upper edge of the remote control (transmission window).
  • Check the battery terminals.

If your remote control still does not work properly

There are four conditions that can cause a remote to function improperly :

  • Bad batteries.
  • An electronic glitch in the remote.
  • A defective remote.
  • A defective remote sensor on the TV

To determine which of these conditions is causing your problem, follow these steps:

  1. Open the battery compartment on the back of the remote and remove both batteries.
  2. Press and hold any button on the remote for 20 Seconds.
  3. Release the button and reinsert the batteries properly.
    Important : Make sure to insert the batteries properly.
  4. If the remote works, there was a glitch in the remote that was cleared when you discharged the remote in the prior step. If the remote does not work, continue on.
  5. Replace the batteries in the remote with new batteries.
    Important : Make sure to insert the new batteries.
  6. If the remote works, your original batteries are dead. Continue using with new batteries. If the remote does not work, there may be something wrong with the remote or with the remote sensor on the TV. Continue on.
  7. To test the remote control and the remote sensor, perform one of the following tests: Digital Camera test or Another remote on this TV.

Digital Camera test using a phone camera
If you have any digital camera (including a phone camera), you can test any remote. To test the remote, follow these steps:

  1. Turn your camera on.
  2. Aim the remote at the lens of the camera from about 6-10 inches away.
  3. Press any button on the remote. You will see the Infra Red eye of the remote flashing on the LCD screen of tour camera if the remote is working properly.
  4. If the above test indicated the remote is working, the problem is in the remote sensor on the TV. If the above test indicated that remote is not working, you have a defective remote.

Test Another Remote on this TV
If the TV has another remote that is known to work on this TV, you can test that remote on the TV. To test a second remote on the TV, follow these steps:

  1. Make sure that the second remote is in the TV mode.
  2. Press [Power] on the remote and see if it turns the TV on.

If the TV turns on, the problem is in your Toshiba remote. If the TV does not turn on, the problem is in the remote sensor.